Someone just posted on my old post – Do I love my thermomix (you might be surprised), asking for an update on how I’ve settled in with my machine. I was fairly strident in my skepticism back then, so it seems only fair to fill you in on how I’ve gone, long term. It’s been 15 months now, so the novelty has worn off and I can assess its usefulness without my mind being swayed by the TM hype.
So here’s the truth…. I don’t use my thermomix very often. But when I DO use it, it’s fantastic. But I can get by without it for days on end.
My husband calls it the $2000 egg poacher, since I’ll go for a couple of weeks doing nought with it but bunging on a bit of breakfast. ‘But what a breakfast!’, I say. Perfectly soft-boiled eggs. Almost. Every. Time (colder water temps in winter meant I had to up the cooking time – learned that the hard way one morning, cracking open an almost raw egg).
Needless to say, husband raises an eyebrow and checks out the space on the wall where his $2000 television could have been proudly mounted. He’d probably have watched that for more than 5 minutes every week or so.
BUT. (And there’s always a but, isn’t there.) I LOVE TO COOK. So pots and pans are a bit joyful for me. Stirring sooths my soul. Chopping calms me down. Cooking is some strange therapy. I totally understand, though, that many people hate cooking and feel the nightly need for food production as a weight of concrete pulling them into the depths of mediocrity. And for those people, then the thermomix is a brilliant device. You need no kitchen flare to produce a good meal. Apparently the new model even tells you what to do next, so you need not even worry yourself with the tedium of recipe reading. GOLD.
And I’ll confess that mid-week, when all the shite is flying everywhere, the TM has saved my skin on many occasions. For me, this is where the machine shines and this is the theory behind the recipes that I chose to convert for my Thermomix ebook (check it out here). It’s perfect for those mid-week food production nights when you just want everyone to just shut up, eat and go to bed.
AND WHAT ABOUT ALL THAT OTHER WHIZZERY-BANGERY THAT IT DOES?
Yes, it does do it, and it does do it well. If you are dealing with food allergies and creating everything from scratch then I can see how much you would love your thermie. I have used it to mill sugar and I use it to mill brown rice into flour. And it’s absolutely-freaking-fantastic at all that. Yesterday, I used it to easily make a fantastic strawberry jam out of some soggy old cheap berries that were definitely no good for eating. GOLD.
But if you’re thinking about buying a thermie, I would keep in mind that rarely does a contraption truly change our behaviour. If you think that a TM will help you eat more vegies, you’re wrong. If you think a TM will allow you enough time to bake bread from scratch, you’re wrong. If you think a TM will save you money, you’re wrong.
If you’re making broader lifestyle changes, then a TM might assist you with those. Going gluten-free is a little easier. Cooking every night from scratch is a little easier. But a thermomix is a lot like a gym membership – forking out the money is NOT ENOUGH to motivate you to truly change your lifestyle if you’re only half-hearted.
If you want to make bread, a breadmaker is a wonderful thing. A $40 rice cooker is essential and does a wonderful job, as does a $40 mini-food processor. For less than $200 I can have all the kitchen help I need to make lasting changes in my lifestyle.
I’d recommend giving some of those gadgets a go before making the big thermomix commitment.

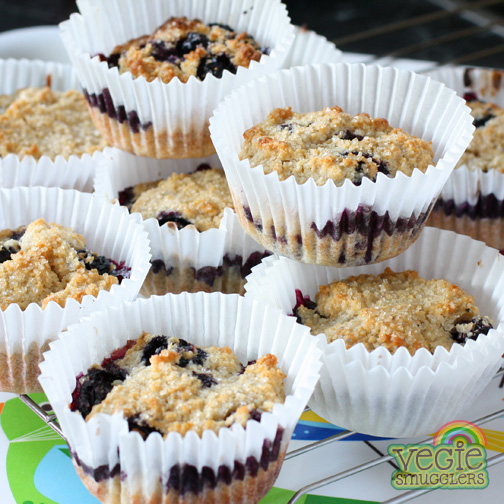
Oats, but not wheat. And quite yummy, too.
Wheat-free blueberry muffins
1 cup brown rice flour (brown rice, milled in the TM on 9 for 30 seconds)
1 cup oat bran
1/2 cup raw sugar
1/2 cup desiccated coconut
2 tsp chia seeds
1 egg
3/4 cup milk
1/2 cup fat (either oil of your choice or melted butter, cooled)
1 punnet blueberries
Preheat the oven to 180C – line 12 muffin holes with paper cases.
In a large bowl, mix together all of the dry ingredients. In a separate bowl or jug, whisk the egg, milk & fat together. Pour into the dry ingredients. Combine well then mix in the blueberries.
Use spoons to divide the mixture evenly between the muffin holes. Bake for 30-35 minutes until firm and golden.
Makes 12.